If you are a full-time E-mail administrator then this information is going to be very helpful for you but it is also very useful for those managing any email domain.
MX Toolbox is great site with many tools for E-mail monitoring and recenly they have included many new tools.
You can register to monitor your domain for blacklist monitoring for FREE. This is very useful if you want to be alerted right away when your domain ends up on an RBL. They monitor over 150 blacklists and alert you via email whenever your domain is spotted on a blacklist.
You can start here: http://www.mxtoolbox.com/services_servermonitoring.aspx
Saturday, March 27, 2010
Friday, March 26, 2010
VMware HA Schematics
Here is screenshot from vSphere Admin guide on HA. I also have included sample cluster HA information to show that without Admission Control Policy default HA settings do not guarantee failover of all VMs even when one thinks that all hosts have are running more VMs than slots available.


Thursday, March 25, 2010
VMware HA Quick Guide
VMware HA
HA is the ability of VMware to power on VMs on another ESX host in case one or more hosts fail in a cluster. Some of the things that you need to know about VMware HA are:
- HA Calculations: HA is based on what is called a “slot”. A slot is basically a reserved space for running a VM in the cluster. Two features that determine a slot are CPU and RAM used by VM. By default VMware HA selects the slot size to be the largest chunk of CPU and RAM used by a VM as shown in the diagram below. HA uses this to determine the number of slots available in the cluster to run the VMs in an HA event. The default selection can be changed by modifying the following advanced attributes:
das.slotMemInMB – Change the memory usage by a VM for slot calculations
das.slotCpuInMHz – Change CPU usage by a VM for slot calculations

- First 5 hosts in a cluster are designated as Primary for HA. At least 1 node in the cluster is selected as Active Primary.
- HA agent is installed on the ESX host and polls for heartbeat every second by default.
- Failure is detected if no heartbeat is received in 15-seconds
- Isolation Network is polled every 12 seconds after which host is designated as Isolated. Service Console default gateway for ESX and VMkernel default gateway for ESXi are pinged for detecting isolation. You can also designate other addresses by modifying das.isolationaddress include other destination in the detection process.
- Admission Control Policy: Ability to reserve resources for HA. You can use Host, VM Restart Priority to control admission policy. VM Restart priorities are defined as
- High – First to start. Use for database servers that will provide data for applications.
- Medium – Start second. Application servers that consume data in the database and provide results on web pages.
- Low – Start Last Web servers that receive user requests, pass queries to application servers, and return results to users.
- Disables admission control: If you select this option, virtual machines can, for
- example, be powered on even if that causes insufficient failover capacity. When
- this is done, no warnings are presented, and the cluster does not turn red. If a cluster has insufficient failover capacity, VMware HA can still perform
- failovers and it uses the VM Restart Priority setting to determine which virtual
- machines to power on first.
- Enable port fast (Cisco) on the switches as best practice for bypassing spanning tree delays.
- VM Monitoring – HA also has the ability to monitor VMs but requires that VMware Tools be installed and running. Occasionally, virtual machines that are still functioning properly stop sending heartbeats. To avoid unnecessarily resetting such virtual machines, the VM Monitoring service also monitors a virtual machine's I/O activity. If no heartbeats are received within the failure interval, the I/O stats interval (a cluster-level attribute) is checked. The I/O stats interval determines if any disk or network activity has occurred for the virtual machine during the previous two minutes (120 seconds). If not, the virtual machine is reset. This default value (120 seconds) can be changed using the advanced attribute das.iostatsInterval.
FREE Online Tools for E-mail Administrators
Here are two great sites that you can use for finding information on number of features like SMTP, Blacklist monitoring, Open-Relay tests, Test-email, etc.
MX Toolbox - http://www.mxtoolbox.com/
Spamhelp - http://www.spamhelp.org/
MX Toolbox - http://www.mxtoolbox.com/
Spamhelp - http://www.spamhelp.org/
Monday, March 22, 2010
Change boot order in Windows 7
You can remove the OS option from Windows 7 boot loader screen by using the following commands in CLI:
bcdedit /bootsequence {current} /remove
bcdedit /displayorder {current} /remove
where {current} is the name of the OS you want remove from boot loader.
bcdedit /bootsequence {current} /remove
bcdedit /displayorder {current} /remove
where {current} is the name of the OS you want remove from boot loader.
Sunday, March 21, 2010
Vmware Site Survey
VMware Site Survey is a very useful utiltiy from VMware that allows you to test whether or not your VMwar environment is ready to use new VMware features such as Fault Tolerance. You can download the utiltiy from VMware website. It runs from your desktop and connects to vCenter. At the end you are presented with an HTML report which explains the results and why certain component is not compatible with new feature(s). It also provide links to HCL for certain hardware.
How to remove Storage Groups in EMC Navisphere?
SAN maintenance is an integral part of and IT manager. However, many of us can't remember some of the easy steps that are required to perform some low level SAN maintenance tasks since we don't perform these tasks very often. Here are quick steps of how to remove a storage group after host(s) are decommissioned and no longer needs the storage.
1. Connect to Navisphere
2. Expand to Storage Group branch in the Local Domain tree
3. Select the storage group you want to remove and right click
4. Select Connect Hosts from the list
5. Select host from the left and click the left arrow to move the host to available hosts on the left.
6. Go to LUNs tab and select the LUNs at the bottom in the Selected LUNs
7. Click Remove
8. Click Apply and Ok
9. Right the click the storage group in question and select Destroy from the list
10. Confirm and close navisphere.
Note: The LUN(s) are still there. You can remove them by going to LUN folder branch and unbind them.
Saturday, March 13, 2010
MPIO & Multihoming Windows Server to iSCSI SAN without Powerpath
How to multihome a Windows server using Microsoft Software iSCSI Initiator to an iSCSI SAN?
This post focuses on connecting a Windows 2008 physical server to EMC CLARiiON CX3-10c using two NICs and Microsoft Software iSCSI initiator. However, this information can also be used for connecting any Windows 2003 server and iSCSI SAN.
Step 1. Connect to Navisphere using your Java enabled browser and Identify iSCSI traffic subnet for the iSCSI ports. You will need single available IP address from each subnet to assign to each of the NICs in the server. You should rename the NICs iSCSI#1 and iSCSI#2.
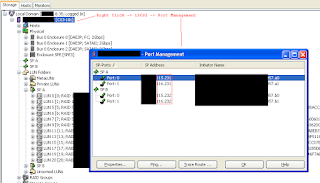
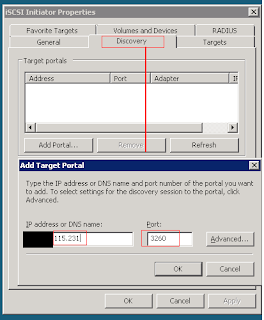
Step 2. Open iSCSI initiator and go to Discovery tab then click Add Target Portal and enter either of the IP address listed on the target in the figure above in Step 1. Enter 3260 for port. Hit Ok.
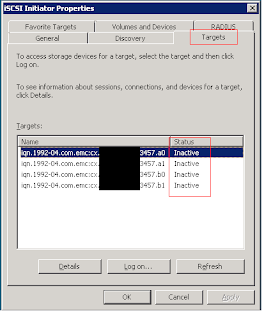
Step 3. Go to Targets tab and notice that all targets are showing up as Inactive. This is normal.
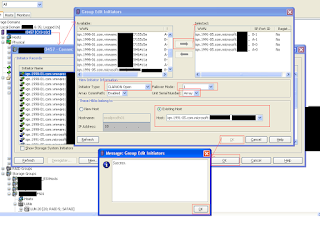
Step 4. Go back to Navisphere and right click the array serial number under Local Domain and select Connectivity Status from the list, Click Group Edit button, and highlight and select the Windows hosts' Initiators WWN which start with iqn.xxx.xxx from the Available WWN from left box show. Hit the right arrow button to move these to Selected WWN strings as shown in the figure below.
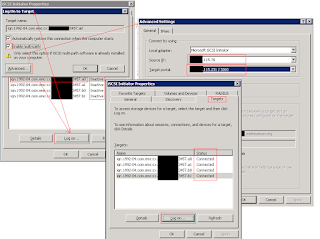
Step 5. Now to go back to Windows Host and open Software iSCSI Initiator properties dialog box.
- Select the first inactive target and click on Log on ... button
- Tick both checkboxes for Automatically restore... and Enable multi-path...
- Click on Advanced button and select Micrsoft iSCSI Initiator for Local adapter Source IP for first NIC (iSCSI#1) and Target Portal on the same subnet as the Source IP
- Click OK buttons all the way back to the Targets tab on the properties box of iSCSI initiator- Repeat these steps for all inactive targets until you see all targets connected. Remeber to use the same subnet for each source IP.
Step 6. Choose a load balance policy for iSCSI connection i.e. Round Robin, Failover, etc. Failover is fine for this example.
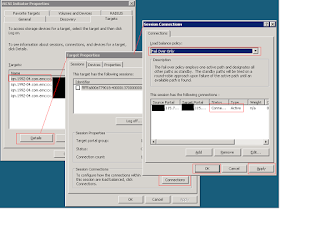
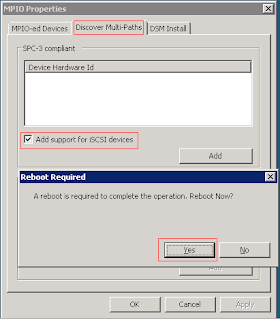
Step 7. Enable MPIO. Go to Discover Multi-paths and select Add Support for iSCSI devices. Reboot the machine.
Step 8. Create new RAID groups or use existing ones to create new LUN(s). Create a new storage group for the host and add the LUNs to the storage group. Connect the Host to the storage group from the available connections lists. Reboot the host one more time.
Step 9. Go to disk management tool using diskmgmt.msc and format the disk and assign the letter.
Step10. Perform failover test by disabling iSCSI#1 NIC and then disabling iSCSI#2 NIC.
This post focuses on connecting a Windows 2008 physical server to EMC CLARiiON CX3-10c using two NICs and Microsoft Software iSCSI initiator. However, this information can also be used for connecting any Windows 2003 server and iSCSI SAN.
Step 1. Connect to Navisphere using your Java enabled browser and Identify iSCSI traffic subnet for the iSCSI ports. You will need single available IP address from each subnet to assign to each of the NICs in the server. You should rename the NICs iSCSI#1 and iSCSI#2.

Step 2. Open iSCSI initiator and go to Discovery tab then click Add Target Portal and enter either of the IP address listed on the target in the figure above in Step 1. Enter 3260 for port. Hit Ok.

Step 3. Go to Targets tab and notice that all targets are showing up as Inactive. This is normal.

Step 4. Go back to Navisphere and right click the array serial number under Local Domain and select Connectivity Status from the list, Click Group Edit button, and highlight and select the Windows hosts' Initiators WWN which start with iqn.xxx.xxx from the Available WWN from left box show. Hit the right arrow button to move these to Selected WWN strings as shown in the figure below.

Step 5. Now to go back to Windows Host and open Software iSCSI Initiator properties dialog box.
- Select the first inactive target and click on Log on ... button
- Tick both checkboxes for Automatically restore... and Enable multi-path...
- Click on Advanced button and select Micrsoft iSCSI Initiator for Local adapter Source IP for first NIC (iSCSI#1) and Target Portal on the same subnet as the Source IP
- Click OK buttons all the way back to the Targets tab on the properties box of iSCSI initiator- Repeat these steps for all inactive targets until you see all targets connected. Remeber to use the same subnet for each source IP.

Step 6. Choose a load balance policy for iSCSI connection i.e. Round Robin, Failover, etc. Failover is fine for this example.

Step 7. Enable MPIO. Go to Discover Multi-paths and select Add Support for iSCSI devices. Reboot the machine.

Step 8. Create new RAID groups or use existing ones to create new LUN(s). Create a new storage group for the host and add the LUNs to the storage group. Connect the Host to the storage group from the available connections lists. Reboot the host one more time.
Step 9. Go to disk management tool using diskmgmt.msc and format the disk and assign the letter.
Step10. Perform failover test by disabling iSCSI#1 NIC and then disabling iSCSI#2 NIC.
Thursday, March 11, 2010
PowerCLI Script for Snapshot Reporting (vSphere)
VMware vSphere or VI3 doesn't provide a native way to run scheduled snapshot reports. However, having a daily snapshot report can be very useful specially if you are using an snapshot based backup software to backup your VMs like Vizioncore's vRanger Pro. Orphaned or uncleaned snapshots can be problematic because they grow in size and can fill up space on the datastore where snapshot is residing. These lingering snapshots can cause VMs to become corrupt or other new backup jobs from completing.
For VI3 you can write a perl script that runs on each ESX host. However, now VMware provides a scripting mechanism based on PowerShell called PowerCLI which has over 140 cmdlets used by VMware admins to manage vSphere and VI3 (3.5 Update 2 and above) environment.
I couldn't find any script online that would provide this functionality so I wrote a PowerShell script using PowerCLI myself and here it is.
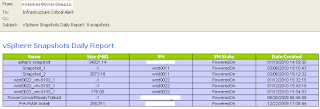
You can download the script from here: Generate VMware VM Snapshots Reports PowerCLI Script
Output looks like this:
Setup Instructions:
1. Download the zip file to local vCenter server and extract to a folder. There are three files .ps1, .bat and .xml.
2. Modify the script configuration section to include your company's information For example
# Configuration Parameters: Update your information here.
# -------------------------------------------------------
$server = "vcenter.abc.com"
$user = "abc\admin-vc"
$pass = "ABCPassword"
$SMTPserver = "smtp.abc.com"
$from = "vcenter@abc.com"
$to = "alerts@abc.com"# -------------------------------------------------------
3. Install PowerShell and PowerCLI on vCenter server
4. Enable remote script execution by running Set-ExecutionPolicy RemotelySigned
5. Schedule the script in Windows Scheduler using the batch file provided.Full Script
#
# Created 3/5/2010
#
#
# Purpose: Creates and email snapshot report in html format for all VMs running on VMWare vSphere
#
# Usage Notice: Use at your own risk
#
# Configuration Parameters: Update your information here.
# -------------------------------------------------------------
$server = "vcenter.yourdomain.org"
$user = "Windows-UPN\admin-user"
$pass = "Password"
$SMTPserver = "smtp.yourdomain.org"
$from = "[email protected]"
$to = "[email protected]"
# ------------------------------------------------------------
if ( $DefaultVIServers.Length -lt 1 )
{
Connect-VIServer -Server $server -Protocol https -User $user -Password $pass -WarningAction SilentlyContinue Out-Null
}
# Format html report
$htmlReport = @"
<style type='text/css'>
.heading {
color:#3366FF;
font-size:12.0pt;
font-weight:700;
font-family:Verdana, sans-serif;
text-align:left;
vertical-align:middle;
height:30.0pt;
width:416pt
}
.colnames {
color:white;
font-size:8.0pt;
font-weight:700;
font-family:Tahoma, sans-serif;
text-align:center;
vertical-align:middle;
border:.5pt solid windowtext;
background:#99CC00;
}
.text {
color:windowtext;
font-size:8.0pt;
font-family:Arial;
text-align:center;
vertical-align:middle;
border:.5pt solid windowtext;
background:#CCCCFF;
}
</style>
<table border=0 cellpadding=0 cellspacing=0 width=555
style='border-collapse:collapse;table-layout:fixed;width:600pt'>
<tr style='height:15.0pt'>
<th colspan=5 height=40 width=555 class="heading">
vSphere Snapshots Daily Report</th>
</tr>
<tr>
<th class="colnames">Name</th>
<th class="colnames">Size (MB)</th>
<th class="colnames">VM</th>
<th class="colnames">VM State</th>
<th class="colnames">Date Created</th>
</tr>
"@
$vmlist = Get-VM -Server $server
$snapshotCount = 0
ForEach ($vm in $vmlist)
{
# List snaphosts
$snapshots = Get-Snapshot -VM (Get-VM -Name $vm.Name) -WarningAction SilentlyContinue
if ($snapshots -ne $null)
{
ForEach ($snapshot in $snapshots)
{
if( $snapshot -ne $null)
{
$snapshotCount = $snapshotCount + 1
$htmlReport = $htmlReport +
"<tr><td class='text'>" + $snapshot.Name + "</td>" +
"<td class='text'>" + $snapshot.SizeMB + "</td>" +
"<td class='text'>"+ $vm.Name + "</td>" +
"<td class='text'>" + $vm.PowerState + "</td>" +
"<td class='text'>" + $snapshot.Created + "</td></tr>"
}
}
}
}
$htmlReport = $htmlReport + "</table>"
Disconnect-VIServer -Server $server -Force:$true -Confirm:$false
# Send email
$subject = "vSphere Snapshots Daily Report: " + $snapshotCount + " snapshots"
$emailbody = "No snapshot was found."
if( $snapshotCount -gt 0 )
{
$emailbody = $htmlReport
}
$mailer = New-Object Net.Mail.SMTPclient($SMTPserver)
$msg = New-Object Net.Mail.MailMessage($from, $to, $subject, $emailbody)
$msg.IsBodyHTML = $true
$mailer.send($msg)
For VI3 you can write a perl script that runs on each ESX host. However, now VMware provides a scripting mechanism based on PowerShell called PowerCLI which has over 140 cmdlets used by VMware admins to manage vSphere and VI3 (3.5 Update 2 and above) environment.
I couldn't find any script online that would provide this functionality so I wrote a PowerShell script using PowerCLI myself and here it is.
You can download the script from here: Generate VMware VM Snapshots Reports PowerCLI Script
Output looks like this:

Setup Instructions:
1. Download the zip file to local vCenter server and extract to a folder. There are three files .ps1, .bat and .xml.
2. Modify the script configuration section to include your company's information For example
# Configuration Parameters: Update your information here.
# -------------------------------------------------------
$server = "vcenter.abc.com"
$user = "abc\admin-vc"
$pass = "ABCPassword"
$SMTPserver = "smtp.abc.com"
$from = "vcenter@abc.com"
$to = "alerts@abc.com"# -------------------------------------------------------
3. Install PowerShell and PowerCLI on vCenter server
4. Enable remote script execution by running Set-ExecutionPolicy RemotelySigned
5. Schedule the script in Windows Scheduler using the batch file provided.Full Script
#
# Created 3/5/2010
#
#
# Purpose: Creates and email snapshot report in html format for all VMs running on VMWare vSphere
#
# Usage Notice: Use at your own risk
#
# Configuration Parameters: Update your information here.
# -------------------------------------------------------------
$server = "vcenter.yourdomain.org"
$user = "Windows-UPN\admin-user"
$pass = "Password"
$SMTPserver = "smtp.yourdomain.org"
$from = "[email protected]"
$to = "[email protected]"
# ------------------------------------------------------------
if ( $DefaultVIServers.Length -lt 1 )
{
Connect-VIServer -Server $server -Protocol https -User $user -Password $pass -WarningAction SilentlyContinue Out-Null
}
# Format html report
$htmlReport = @"
<style type='text/css'>
.heading {
color:#3366FF;
font-size:12.0pt;
font-weight:700;
font-family:Verdana, sans-serif;
text-align:left;
vertical-align:middle;
height:30.0pt;
width:416pt
}
.colnames {
color:white;
font-size:8.0pt;
font-weight:700;
font-family:Tahoma, sans-serif;
text-align:center;
vertical-align:middle;
border:.5pt solid windowtext;
background:#99CC00;
}
.text {
color:windowtext;
font-size:8.0pt;
font-family:Arial;
text-align:center;
vertical-align:middle;
border:.5pt solid windowtext;
background:#CCCCFF;
}
</style>
<table border=0 cellpadding=0 cellspacing=0 width=555
style='border-collapse:collapse;table-layout:fixed;width:600pt'>
<tr style='height:15.0pt'>
<th colspan=5 height=40 width=555 class="heading">
vSphere Snapshots Daily Report</th>
</tr>
<tr>
<th class="colnames">Name</th>
<th class="colnames">Size (MB)</th>
<th class="colnames">VM</th>
<th class="colnames">VM State</th>
<th class="colnames">Date Created</th>
</tr>
"@
$vmlist = Get-VM -Server $server
$snapshotCount = 0
ForEach ($vm in $vmlist)
{
# List snaphosts
$snapshots = Get-Snapshot -VM (Get-VM -Name $vm.Name) -WarningAction SilentlyContinue
if ($snapshots -ne $null)
{
ForEach ($snapshot in $snapshots)
{
if( $snapshot -ne $null)
{
$snapshotCount = $snapshotCount + 1
$htmlReport = $htmlReport +
"<tr><td class='text'>" + $snapshot.Name + "</td>" +
"<td class='text'>" + $snapshot.SizeMB + "</td>" +
"<td class='text'>"+ $vm.Name + "</td>" +
"<td class='text'>" + $vm.PowerState + "</td>" +
"<td class='text'>" + $snapshot.Created + "</td></tr>"
}
}
}
}
$htmlReport = $htmlReport + "</table>"
Disconnect-VIServer -Server $server -Force:$true -Confirm:$false
# Send email
$subject = "vSphere Snapshots Daily Report: " + $snapshotCount + " snapshots"
$emailbody = "No snapshot was found."
if( $snapshotCount -gt 0 )
{
$emailbody = $htmlReport
}
$mailer = New-Object Net.Mail.SMTPclient($SMTPserver)
$msg = New-Object Net.Mail.MailMessage($from, $to, $subject, $emailbody)
$msg.IsBodyHTML = $true
$mailer.send($msg)
How to Restore Mailbox using Recovery Storage Group in Exchange 2007?
Using Recovery Storage Group to restore mailbox items or complete mailboxes can be quite difficult for someone new to Exchange 2007 interface. RSG was introduced in Exchange 2003. It allows the mounting of production and backup databases side by side and uses built-in ExMerge in Exchange 2007 Tools to do the merge.
Here are detailed guidelines that you can download with screenshots and instructions on how to perform a restore from backup tapes using Symantec BackupExec and Exchange 2007 SP1 Recovery Storage Group.
Note: You can only have on RSG at a time.
Here are detailed guidelines that you can download with screenshots and instructions on how to perform a restore from backup tapes using Symantec BackupExec and Exchange 2007 SP1 Recovery Storage Group.
Note: You can only have on RSG at a time.
Download PDF version here: How to Restore Mailbox using Recovery Storage Group in Exchange 2007
Summary Step 1 Open EMC on either active or passive nodes and go to Toolbox. Double click Database Recovery Management
Step 2 Get the latest updates if updates are available. If not, click Go to Welcome screen
Step 3 Enter the server name (CCR Node) and click Next
Step 4 Click Create a recovery Storage Group
Step 5 Click Storage Group that you want to restore (i.e. S07) and click Next
Step 5a Create a folder with the same name as shown for Recovery storage group (R00.log) log path (i.e. RSG20090828163917) under S07-LOGS subdirectory.
Step 5b Now click Browse for Recovery Storage Group (R00.chk) path and select the folder you created in the previous step.
Step 5c Click Create Recovery Storage Group
Step 6 Once storage group is created, click Go back to task center
Step 7a Now Login to the backup (media) server. Open Backup Exec GUI
Step 7b Create a Restore Job with settings shown in the following 3 screenshots and click submit. Wait for the job to finish restoring. The time it takes to restore will depend on weather you’re restoring from disk or tape. In this example we are restoring from disk.
Step 8 Go back to EMC and click on Mount or dismount databases in the recovery storage group
Step 9 Once completed click on Go back to task center
Step 10 Click on Merge or copy mailbox contents and follow the steps in the next 7 screenshots
Step 11 Once completed, click Go back to task center
Step 12 Click on Mount or dismount databases in the recovery storage group to dismount the database the recovery database. Follow the step in the next 4 screenshots
Congratulation! You have successfully restored a mailbox using Exchange 2007 Recovery Storage Group and embedded ExMerge.
You can now close EMC.
You can now close EMC.
Subscribe to:
Posts (Atom)